
Getting Started With Web Soil Survey
Soil surveys are being completed and published in printed form on an ongoing schedule. As time passes, the data in printed surveys can become out of date. The up-to-date official information about the soils in a given area is now available in electronic form for each of the Soil Survey Areas. Web Soil Survey provides interactive access to the most current information for a user-defined Area of Interest. Click the following link to go to the Web Soil Survey home page: Web Soil Survey Home Page. If spatial soil data are available for your Area of Interest, Web Soil Survey also generates soil maps. Web Soil Survey also provides the capability to download official Soil Survey Geographic Database (SSURGO) soil data for whole soil survey areas. Generalized soil data (State Soil Geographic Database or STATSGO2) can also be downloaded in individual state datasets or the whole U.S.
Information about how to use Web Soil Survey, including a link to this Getting Started document, is available on the Web Soil Survey home page. Look on the right side of the home page in the I Want To... and I Want Help With... sections.
Here’s a brief overview to get you started using Web Soil Survey:
- Browse to the Web Soil Survey home page at the following link: Web Soil Survey Home Page.
- To start the application, click the large round green button labeled Start WSS.
- To work with Web Soil Survey interactively, jump to step 4 below. To download soils data for a full survey area or for State Soil Geographic Database (STATSGO2) data, click the Download Soils Data tab.
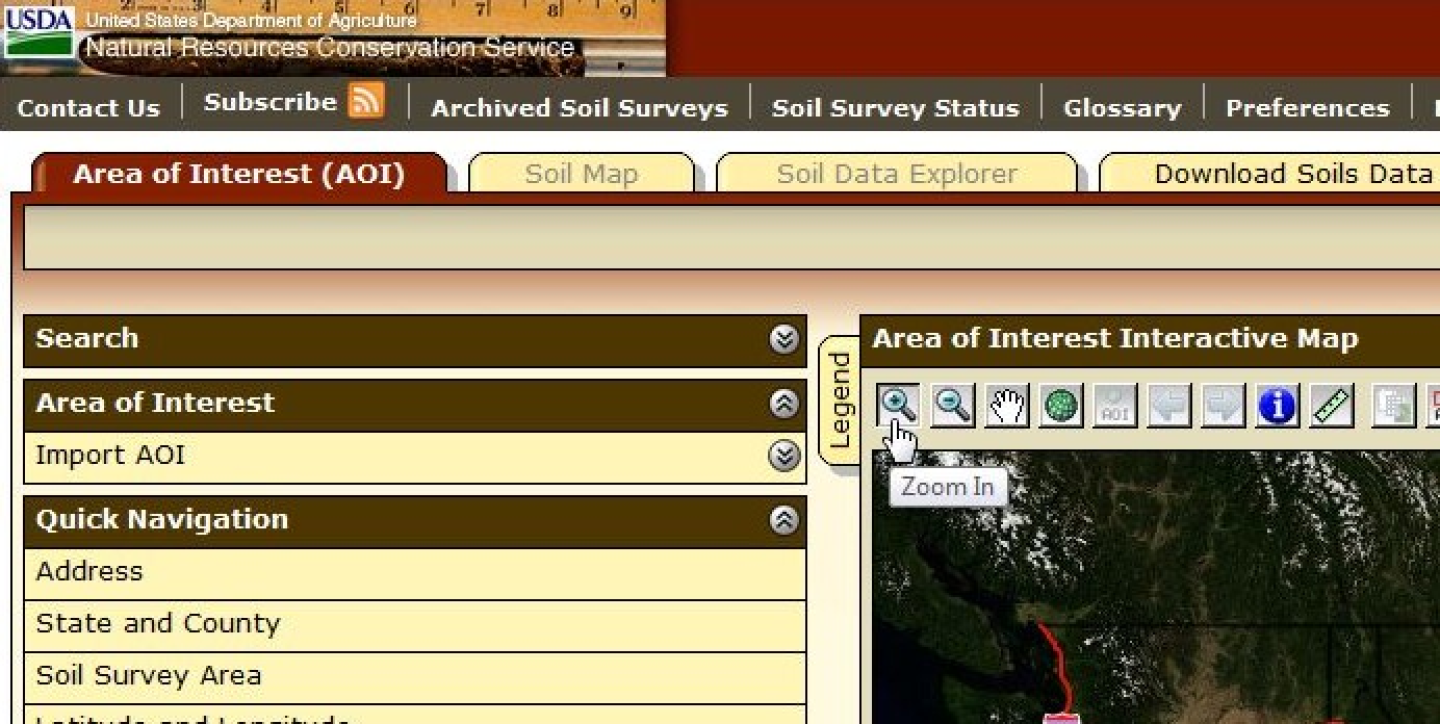
- After the map refreshes, you can use the Zoom In map tool. Click on the Zoom In tool to put the map in Zoom In mode. Then either click on the map to zoom in, or click and drag the map to zoom to the rectangle you’ve drawn. Zoom in as close as you need.
- Or alternatively, on the left side of the browser window, in the Quick Navigation panel, click on one of the forms — Address, State and County, Soil Survey Area, etc. Enter the information, and click View.
- Before you can view any soil data, you must define your Area of Interest or AOI. You can set your AOI by drawing a rectangle or a polygon on the map, or you can set your AOI to a whole Soil Survey Area. You can also create a multi-part AOI using the Create AOI from Shapefile or Create AOI from Zipped Shapefile options under the Import AOI menu. AOIs created using the AOI Rectangle and AOI Polygon tools are limited to a maximum of 100,000 acres, but Soil Survey Area AOIs are not.
To set your AOI to a rectangle, click the AOI Rectangle map tool. Then click and hold the left mouse button, and drag a rectangle on the map. When you release the mouse button, the rectangle you’ve drawn will be set as your Area of Interest.
To set your AOI to a polygon, click the AOI Polygon map tool. Then click points on the map to define your AOI. To finish, either double click the last point, or hold down the Control key while clicking the last point.
To set your AOI to a whole Soil Survey Area, in Quick Navigation, open the Soil Survey Area form. Choose a state and Soil Survey Area using the dropdowns. Then click Set AOI.
- Once you have set your AOI, click the Soil Map tab to see the soil map and map unit information.
- To create a printable document containing the map and information on the Soil Map tab, click the Printable Version button, and then click the View button.
- To run soil ratings or soil reports, click the Soil Data Explorer tab, then the one of the inner tabs: Suitabilities and Limitations for Use, Soil Properties and Qualities, or Soil Reports
. - On the left side of the browser window, click the Open All button to expand all the folders, or click an individual folder to list the items within it.
- Click one of the items to open the form, then set options as desired, and click View Rating or View Soil Report. This will show the data in tabular form and, for the Ratings, in color-coded map form. Click the Legend tab at the left side of the map to see a legend of the Rating values.
- To create a printable version of the soil data, click Printable Version or Add to Shopping Cart:
Printable Version generates a Portable Document Format (PDF) document containing the rating or report that you just ran.
Add to Shopping Cart adds the report or map to the shopping cart. You can add multiple ratings and reports to the shopping cart and then create a Portable Document Format (PDF) document containing all the items you added to it. The AOI soil map and the list of map units and their descriptions are added to the shopping cart by default.
Once you’re done adding content to the shopping cart, click the Shopping Cart (Free) tab, and then click the Check Out button. This will generate a single Portable Document Format (PDF) document containing all the items you added. By default, the Soil Map content is automatically included in your Portable Document Format (PDF) document.
For best results, limit the number of items you add to the shopping cart to ten or fewer.
- There is a Search function that you can use to search for where specific keywords occur in the application. The Search form is located in the upper left corner of each tab. Set your Area of Interest, then click Search and enter keywords, such as “hydric rating” or “KCl”, and then click the Search button. The search results are links that navigate to the place in the application where the keywords were found.
- After you have defined your AOI, you can also click the Download Soils Data link to download tabular and spatial soils data for your AOI. You will need Microsoft Access software to make use of the tabular data, and ArcGIS software to make use of the spatial data.
- Throughout Web Soil Survey, context-specific help is available by clicking the question mark icon. For more information, see “How can I get help using Web Soil Survey?” on the Frequently Asked Questions page: How can I get help using Web Soil Survey?
- For assistance with specific soil data questions, you may click the Contact Us link. The Contact Us link is also located beneath the USDA logo in the upper-left corner of Web Soil Survey.
For further assistance, you can also email: soilshotline@usda.gov.